This feature is ✔️ available for:
Plan: Business Plus, Enterprise
Decide where your team's files are stored. Choose from twelve secure data centers to store your data: Brazil, Canada, France, Germany, Ireland, the Netherlands, Singapore, Switzerland, UAE, UK and two US locations. You can customize the setting by user groups to satisfy regional law and regulations.
Enable Data Residency Options
- Business Plus
- Enterprise
If you are on Business Plus plan you can select your preferred data center under the Settings menu in your Admin Center. This setting will apply for all the subscription members.
If you are on Enterprise plan you don’t have to do anything — this feature is available to you by default and you can select the preferred data center on a policy level.
What to expect
- From now on, new folders will be stored on the location you selected.
- Changing data residency on a template will not affect existing folders. They will stay on their old location unless they are moved manually.
- Unless they have admin rights, users can’t see their own policy template — you will need to inform them about the new setting.
- Users will need to move their folders to the new location manually — learn how they can do it.
- Folder sharing and invitations won’t be affected by this policy setting. Users can be invited to folders that are stored on different locations and upload files there.
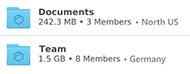
- When a user has folders on multiple data centers, Tresorit will display the locations like this:
- When a user moves files and subfolders between folders with different data locations they will be stored according to the location of the destination folder.
Set up a new data location
In case you are on Enterprise plan you can choose a custom location for every policy template you have. Once you’re done, every new folder will be stored on that location. Older folder, however, won’t be migrated automatically.
- Change policy template
- Create new template
- Navigate to the
 Policies tab.
 - Click on a template.
- Open the dropdown under Data residency options.
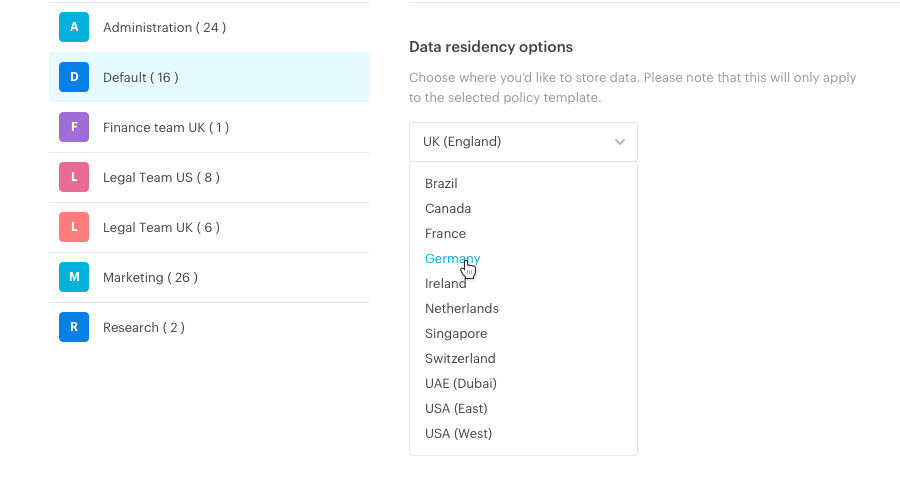
- Select a data center.
- Click Save.
- Click OK.
- Navigate to the Policies tab.
- Click Create New Template at the top.
-
Open the dropdown.
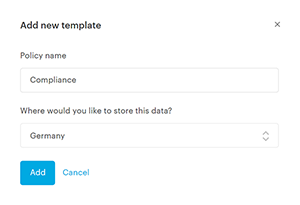
- Select a data center.
- Click Add.
- Customize the settings.
- Assign users to the template.
Still have questions left? Drop us a line